Listing Automation
How to run the AI listing pipeline
Drop in model numbers, the AI writes the copy, results land in Airtable for review — the same pages also generate each collection's own name per marketplace. This guide only covers operation, not the internals, split into two parts — Generate contents: generating a marketplace collection name, generating copy, getting around the Airtable base; Manage prompts: editing/adding a prompt, syncing prompts, testing a custom marketplace, retiring a prompt, updating catalog data.
Generate marketplace collection name
The web form's Collection Names tab — the same internal collection needs a different name per marketplace; this generates, reviews, and saves it.
- 1Pick one Marketplace — this page works one marketplace at a time, because "already has a name" and "collides with something" are both evaluated per marketplace.
- 2Paste Model Numbers, one per line, and click
Look up collections— the system looks up which internal collection each model belongs to in Supabase. - 3Models with no collection found (not imported yet, or the catalog cell was blank) are called out separately — they don't block the rest from continuing.
- 4Every collection found gets its own checkbox — one that already has a confirmed name for this marketplace starts unticked, everything else starts ticked. Ticking an "already has one" collection anyway is how you ask for a fresh suggestion — it replaces the old one (the previously confirmed name is untouched until you confirm again).
- 5Click
Generate names— only the ticked collections get an AI call.
| Collection | Marketplace | Name | Status |
|---|---|---|---|
| Bristol | Wayfair | Whitfield | Confirmed |
| Poppy | Wayfair | Marigold | New |
- 6Results land directly in an editable table — the
Namecell is a text box, so an AI suggestion you don't like can just be typed over. Already-confirmed collections (Bristol here) are listed too, so everything's visible in one place. - 7Click
Save & confirm: the edited (or AI-given) name is saved to Supabase, status becomes Confirmed. A dialog opens first and asks you to pick the marketplace again — if your pick doesn't match the marketplace in the table, it can't be saved (re-pick or cancel); this applies to AI-generated and Excel-uploaded names alike. Before that, an AI suggestion only lives in this browser tab — it's never saved to Supabase; refresh or look up again and it's gone, as if it never happened.
Another way: upload an Excel (no AI)
Already have the names (say, a collection mapping sheet)? No need to ask the AI. There's a Generate / Upload slider at the top — click or drag it; switching clears the table below so the two sources never mix in one save.
- 8Pick the Marketplace above, flip the switch to
Upload, choose an.xlsxfile and clickRead Excel. Only the first sheet is read, with row 1 as the header. - 9Two dropdowns appear under "Match the columns": the internal collection name column (defaults to the first column) and this marketplace's name column (Home Depot pre-selects the header containing "homedepot"; for other marketplaces pick it yourself). Below them you see how many rows will be read and a three-row sample; rows with a blank name for this marketplace are skipped. Picking the same column twice is flagged and blocked.
- 10Click
Load namesand they land in the same editable table — only staged for now, not confirmed and not occupying the name. Check and edit them, thenSave & confirm(the same confirm-marketplace dialog appears first). The duplicate rules are the same as for AI names (see the expandable note below), except the "no word Collection" rule, which only ever applied to AI output.
The statuses that can show up in that table —
New = just generated, not saved yet; Confirmed = saved and synced. Both green — nothing wrong.
This row was pulled in from an already-confirmed record, not generated just now — it existed before this lookup.
The AI tried several times (4 by default) and couldn't land on a name that passed every check — the box is left blank and stays editable; type one in yourself and confirm as usual.
(Upload only) The uploaded name differs from the name this collection already has confirmed; "Was: …" is shown beside it. The existing name stays as it is until you Save & confirm.
(Upload only) The internal collection name in the sheet isn't found in the catalog. A hint only — it doesn't block saving — but a model-number lookup will never match it later, so it's usually a typo or a catalog that hasn't been imported yet.
This specific name collided with something when you clicked Save & confirm (see the uniqueness rules below) and was not saved — edit the name and confirm again; the tag clears the moment you start typing, no need to wait for a round trip.
A real technical failure (an AI call error, say), not a naming collision — the box is disabled; click Generate names again to retry.
What exactly counts as a duplicate name? — also where the prompt behind this lives
Only a confirmed name counts — an AI suggestion that hasn't been saved isn't "taken," so two different collections landing on the same unconfirmed suggestion in one batch is completely fine; it's only blocked at the moment someone actually tries to confirm it. A name is rejected if it's:
- 1the same as its own internal collection name — including a trivial variant of it (just appending a generic word like "Collection" doesn't count as different).
- 2already the internal name of a different collection.
- 3already a different collection's confirmed name on any marketplace — not just this one, a different marketplace counts too.
- 4the AI's own suggestion contains the word "Collection"/"Collections" at all, alongside anything else or not (this one only applies to AI output — a person's manual edit has no such restriction).
A collision with rules 1–4 during generation triggers an automatic retry (the failed name gets added to a "don't use these" list for the next attempt), up to 4 times. A collision with rules 1–3 from a person's manual edit is rejected right at confirm time, with no retry — it needs a person to change it.
Generate copy
The web form's Generate tab — paste model numbers, pick a marketplace, one click.
Listing Generator
Paste model numbers, pick a marketplace, and the AI writes the listing copy. Results land in Airtable for review.
Created By/Confirmed By, in Generate's Airtable rows and in Collection Names (Supabase) records. Display name Jane? It records Jane.
- 1Pick the right Marketplace — if it's a newly added one, check Section 3 first to confirm a prompt has actually been published for it. To test a new prompt without touching a real marketplace, use
Other…— see Section 5. - 2Model Numbers — one per line, paste directly, no commas needed.
- 3Click
Generate. The page polls progress on its own; no need to watch it, it usually finishes in a few minutes. - 4Results land automatically in Airtable's Generation Items table — that's where people review, edit, and override.
Category Not Set Up — that means no prompt is configured for this category yet. Go add one in the Prompt Assistant (Section 3); it's not a problem with the model number itself.
Website as the Marketplace skips the AI entirely, so it finishes almost instantly. The whole page goes into the Product Description field as one HTML block: a title-placeholder paragraph, the description (followed by two <br/>), then Highlights / Product Dimension / Care Instruction / Buyer disclaimer as their own <ul> lists, matching the site's own product-page layout. Product Name and Feature Bullets are left blank this time. The title paragraph is fixed as || Fremont & Park – 【Collection】 ||: Fremont & Park – is fixed text, and 【Collection】 is the actual placeholder, since there's no website collection name anywhere in this data. Someone has to fill in the real collection name by hand during review before it's ready to publish; that's expected, not a generation failure. Product Dimension is assembled from the product's weight/size columns and its measurement attributes. The Fabric Cleaning Code line in Care Instruction swaps in the right sentence based on the product's own fabric_cleaning_code (S/P/X); an unrecognized code just leaves that line out rather than guessing.
Submitted the wrong thing, or it's been running long enough that it looks stuck — don't just wait it out, you can stop it mid-run.
- 1Click
Cancelnext to the progress bar — a confirm dialog pops up, and it takes effect the moment you confirm. - 2Anything already generated is kept, untouched; whatever hasn't run yet gets marked stopped and won't consume any more OpenAI calls.
- 3There's no "pause and resume" — cancelled models need to be resubmitted as a new batch.
Refreshed the page and lost the progress bar and Cancel button? You don't have to just wait it out.
- 1Most of the time you don't need to do anything — refreshing in the same browser automatically reconnects to whatever batch is still running.
- 2Switched browsers, cleared storage, or want to check in on someone else's batch — paste its Batch Code (the
WF-...string next to the progress title, also in Airtable's Batches table) into theResume a batchbox at the top of the page and clickLook up. - 3Once found, it behaves exactly like a batch you just started — same progress bar, same working Cancel button.
Around the Airtable base
Reviewing copy happens in this base (editing prompts has moved to the Prompt Assistant) — worth a quick tour first.
Along the top are 5 tables —
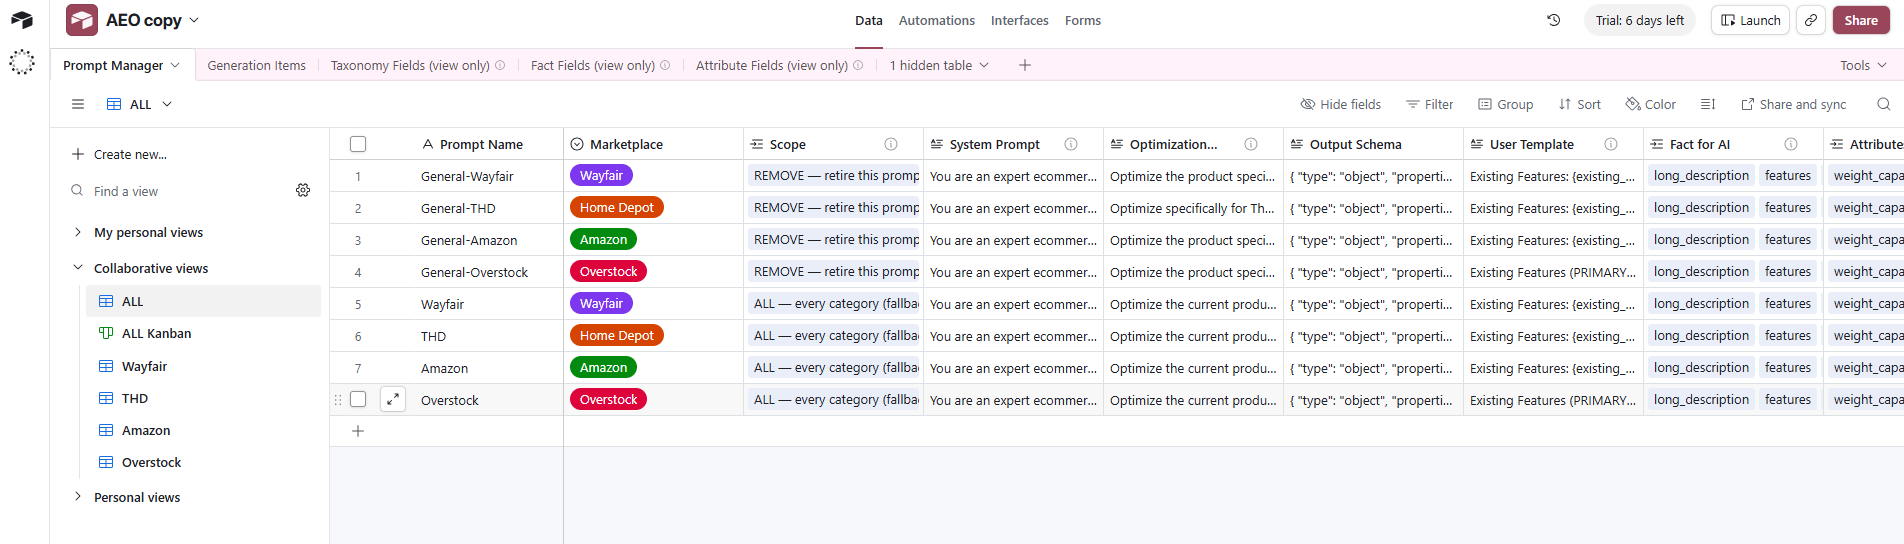
No longer where prompts are edited. The prompt rows now live in Supabase, and editing and publishing happen in the Prompt Assistant (Section 3). This table is an old copy from the day of the switch (2026-10-29); changing it here has no effect.
The table you edit — every AI-generated listing lands here, and this is where people review, edit, and override the copy.
The remaining three all have (view only) in their name — they used to be the pick lists for Prompt Manager's Fact for AI / Attributes for AI / Scope fields. The Prompt Assistant now uses the lists of the same names in Supabase; these three tables are no longer used, and should not be edited by hand.
Two more things worth knowing on the left sidebar of Generation Items —
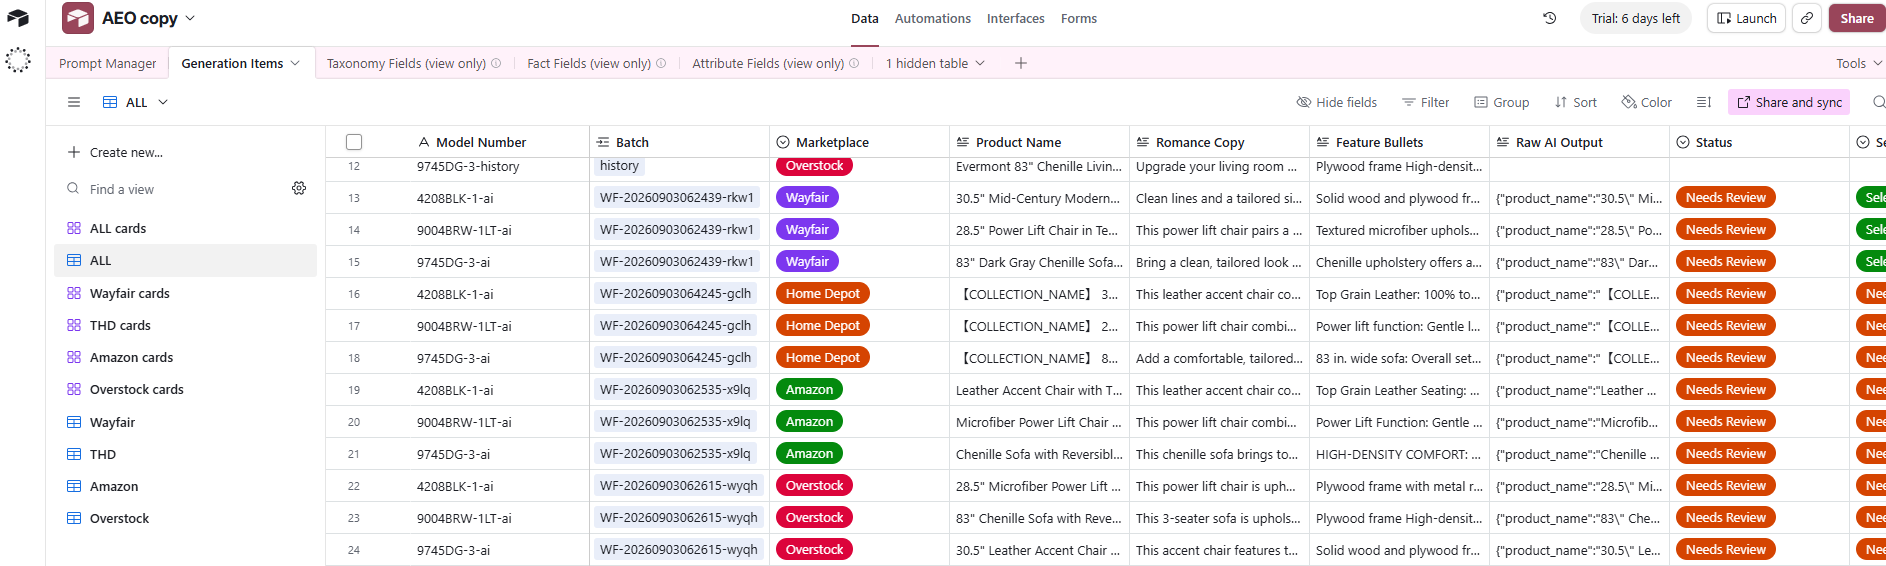
- 1The view list on the left switches what you're looking at — click
Wayfair/THD/Amazon/Overstockto see only that marketplace's rows, no manual filtering needed.
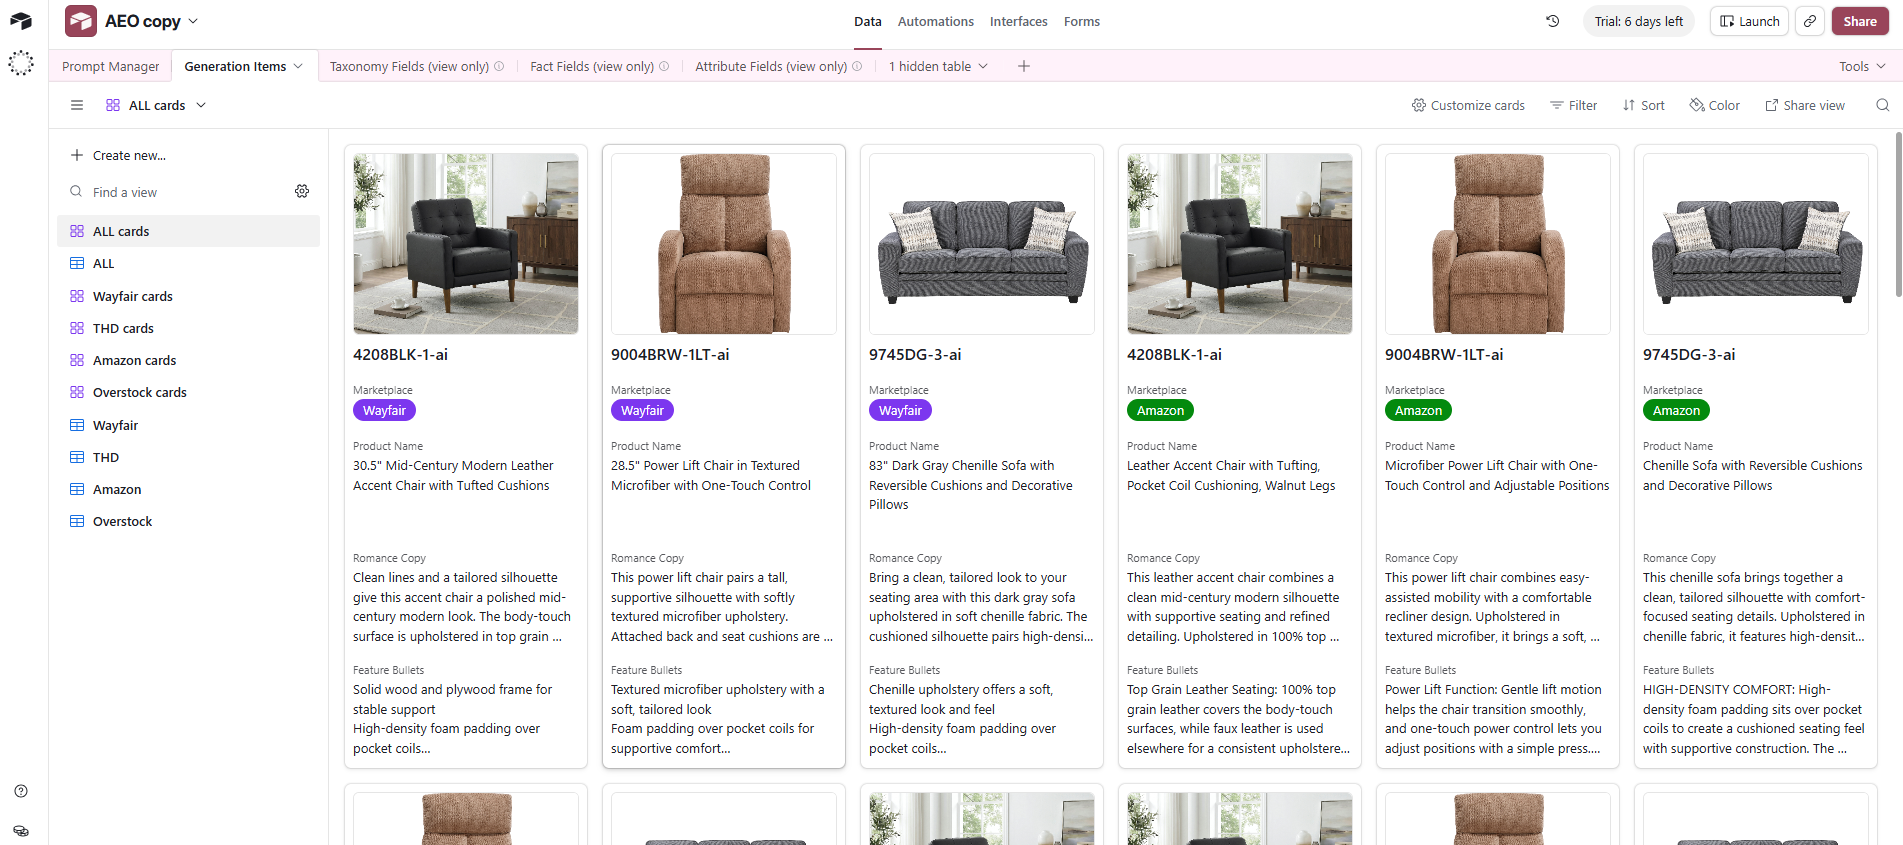
- 2For a visual once-over, switch the left sidebar to
ALL cards(or a marketplace's own... cardsview) — it turns into a card layout with the product photo next to the copy, easier for a final human check than the grid view.
Edit / add a prompt
All done in the Prompt Assistant page (the Prompt Assistant card on the home page): edit, then Push to save and Publish to go live at once — no Sync needed. The field names below are the fields behind each cell in the Prompt Assistant.
ALL or a whole Category) — and edit that copy. It's harder to miss a field or get the format wrong than building one from nothing.
By default, one row calls the AI exactly once — filling in the fields under Call 1 is all it takes.
One call, straight to the final copy. The name "Call 1" is historical (an early version only ever made one call; the second call came later) — in single-call mode, ignore the name: these fields are the entire prompt. Fact for AI / Attributes for AI decide which real product data the AI sees; System Prompt / User Template / Output Schema decide how it writes and what shape comes back.
Create or edit a row, filling in these fields in order —
Just a label for the row — this is what you see in the list, it isn't sent anywhere.
The core instructions: role, task, hard rules, tone, word count, format.
Which product fields the AI is allowed to see — pick from a list, not typed by hand, so picking wrong isn't possible.
Just copy this straight from the corresponding marketplace's ALL row — no need to write it from scratch.
The shape the final copy must come back in — fields like product_name / product_description / feature_bullets. Also just copy this from the corresponding marketplace's ALL row.
Governs whatever step produces the final copy, single-call or two-stage. Blank = no extra checks. If filled in, these are deterministic rules (word-count ranges and the like — nothing that requires AI judgment). A field that fails gets a single targeted retry for just that field, not a full rewrite of the whole item.
Which OpenAI model this prompt calls. gpt-6-luna is the suggested default. In single-call mode (Call 2 left blank) this is the model for the whole prompt; once you split into two stages it governs Call 1 only. Before switching to a reasoning-family model, confirm the backend's token budget is sized for it — see the callout below.
Which model Call 2 (the final copywriting step) uses. Blank = same as Call 1 Model. Ignored in single-call mode. This lets Call 1 plan with a cheaper model while Call 2 writes with a stronger one, or the other way round.
Whether this call attaches the product photo. Always attach = every attempt; First attempt only = photo on the first try, plain text on any retry (the default when left blank); Never attach = always text-only, skips the download/compress step entirely. If Call 2 is later added to split this into two stages, this setting only governs Call 1 — Call 2 (WRITE) never receives a photo either way.
Which categories this prompt covers. Pick a specific category (e.g. Seating | Accent Chairs), or pick ALL — every category (fallback) as the catch-all.
Marked = this row is waiting to publish. The Prompt Assistant's Publish button marks it and sends it out at once; it clears itself on success, so you never handle it.
Once published, go to Section 4 and click this button on the web form — that's what actually makes it live.
Want to split this into two steps instead? — most prompts don't need this; click to see when it's worth it and how to turn it on
Only worth doing if you want the AI to run a separate "content planning" pass first — pick the facts worth leading with and rank them — then use a second call to turn that plan into finished copy. Most prompts don't need this: it's worth the extra API call mainly when the same plan needs to feed very different writing styles, or you want to debug "what to say" and "how to say it" separately.
Content planning. Reads the real product data (whatever Fact for AI selects), picks and ranks the facts worth leading with, and produces a structured Content Plan — not the final copy yet.
The actual copywriting. Only sees the Content Plan Call 1 produced — it never sees the raw product data again, so it can't second-guess the merchandising call. Its only job is turning the already-ranked facts into finished marketplace copy.
Here's exactly how the two calls connect, and what actually gets sent to the AI at each step —
The three fields that only exist for two-stage —
The core instructions for Call 2 (WRITE) — write these assuming it only has the Content Plan in hand, never assume it can see the raw product data. Filling this in is what makes the row two-stage.
The template must include a {content_plan} placeholder — Call 1's result fills in there. Leave it out and publishing fails outright with a clear error, instead of silently rendering nothing and producing empty-feeling copy.
The shape the final copy must come back in — same idea as Call 1 Output Schema, just governing Call 2's output (fields like product_name / product_description / feature_bullets). Once this is filled in, Call 1 Output Schema above goes back to shaping just the Content Plan, not the final copy.
Sync prompts
Publishing from the Prompt Assistant takes effect at once, so you normally don't need this button. It is a back-up: it sends out rows that are marked to publish but have not gone out (say a publish that failed half-way). The button lives in the Payload Viewer tab, which only an admin account can see.
Listing Generator — Payload Viewer
- 1Sign in with an
adminaccount and switch to the Payload Viewer tab. - 2Only needed when a prompt is marked to publish but has not gone out: tick the matching marketplace(s) in the checklist here — you can tick several at once.
- 3Click
Sync Prompts. Each ticked marketplace is processed on its own — a failure on one doesn't block the others. - 4Each line below the button is one marketplace's result:
publish Call 1 vX / Call 2 vYmeans both calls actually published (together, see above);errormeans that row did not go out; the reason is kept in the row's publish result (visible in the Prompt Assistant). - 5A failure retries once automatically; if it still fails, click
Sync Promptsagain — the error text usually names the field that's wrong.
Test a custom marketplace
Want to try a prompt change without touching a real scope like Wayfair's? The Marketplace dropdown's last option, Other…, is exactly for that.
A custom name like Wayfair-xingyuan needs setting up in three places, spelled identically in each:
- 1Prompt Assistant: create or copy a prompt, then set its Marketplace to the new name (any name works as it is; no option to create first). Prompt Name is just a plain-text label, type anything; but that is not the field that matters here — if Marketplace still says Wayfair, the system treats this prompt as the real Wayfair.
- 2Generation Items: this table keeps its own separate list of Marketplace options — add the same new name there too (field header › Edit field › Add option). Generated results get written into this table, and a missing option fails that write.
- 3The web form: pick
Other…on the Generate tab's Marketplace dropdown, and again in the Payload Viewer tab's Sync Prompts checklist — type the exact same name in both.
24: publish Call 1 v1 / Call 2 v1 — that scope is now live, fully separate from real Wayfair.
Retire a prompt
Taking a prompt down for good, with no new version published — also done in the Prompt Assistant.
- 1Find the prompt you want to retire in the Prompt Assistant.
- 2Use the page's retire function: it switches the Scope to
REMOVE — retire this prompt (no new version)and publishes at once. - 3Confirm when asked.
- 4It takes effect straight away: the prompt is no longer used for any product, and the versions published before are kept.
REMOVE row, put the real Scope back, then publish and sync again.
Update catalog data
Only needed when product facts are missing or stale — grab the latest export, then upload it. The Upload Catalog tab only shows up for an editor or admin account; reviewer doesn't get this tab.
First, get the latest file from the Homelegance dashboard —
the .xlsx from the website dashboard. Reads the "Catalog" sheet (required), plus "Bundle" and "Image Link" if present.
- 1In the Homelegance dashboard: Item › Product Downloads › click
Product Sheet Downloadto get the latest export. - 2On the web form's Upload Catalog tab, click
Choose Fileand pick that file, thenRead file— this only parses it in the browser, nothing is written yet. - 3Check the row count shown below, and whether a
Bundle/Image Linksheet was found, then clickImport all rows. - 4For a large file, try
Try 25 rows firston a small batch before running the full one.
A Set model number that's never been in the catalog at all? — "Create a Set from the naming rule", at the bottom of Upload Catalog
A different case from the upload flow above: that one is for a master that's already in the catalog but not yet linked to its components; this tool is for a master that has no row in the catalog at all — it finds the components by a fixed naming rule, validates them, and creates the row directly. Same editor/admin-only visibility as the rest of Upload Catalog.
one per line, e.g. 9646DV*3
- 1Fixed rule, not editable here:
*2=-2+-3(2pc: Love Seat + Sofa);*3=-1+-2+-3(3pc: Chair + Love Seat + Sofa);*2PW/*3PWthe same, with each component model also carrying aPWsuffix. - 2Paste the master model number(s) to create, one per line, and click
Create. - 3Each input gets its own result row: Created — every component was found and they agree on department; the master row and its component links are built, and content rollup (
bundle_components) plus Set classification already ran automatically — nothing else to do by hand.
*2/*3/*2PW/*3PW are recognized; other patterns (like the *4/*9-style bedroom/dining Set codes) aren't handled by this tool.